必备基础技能训练15 项
【基础01】LED 指示灯的基本控制
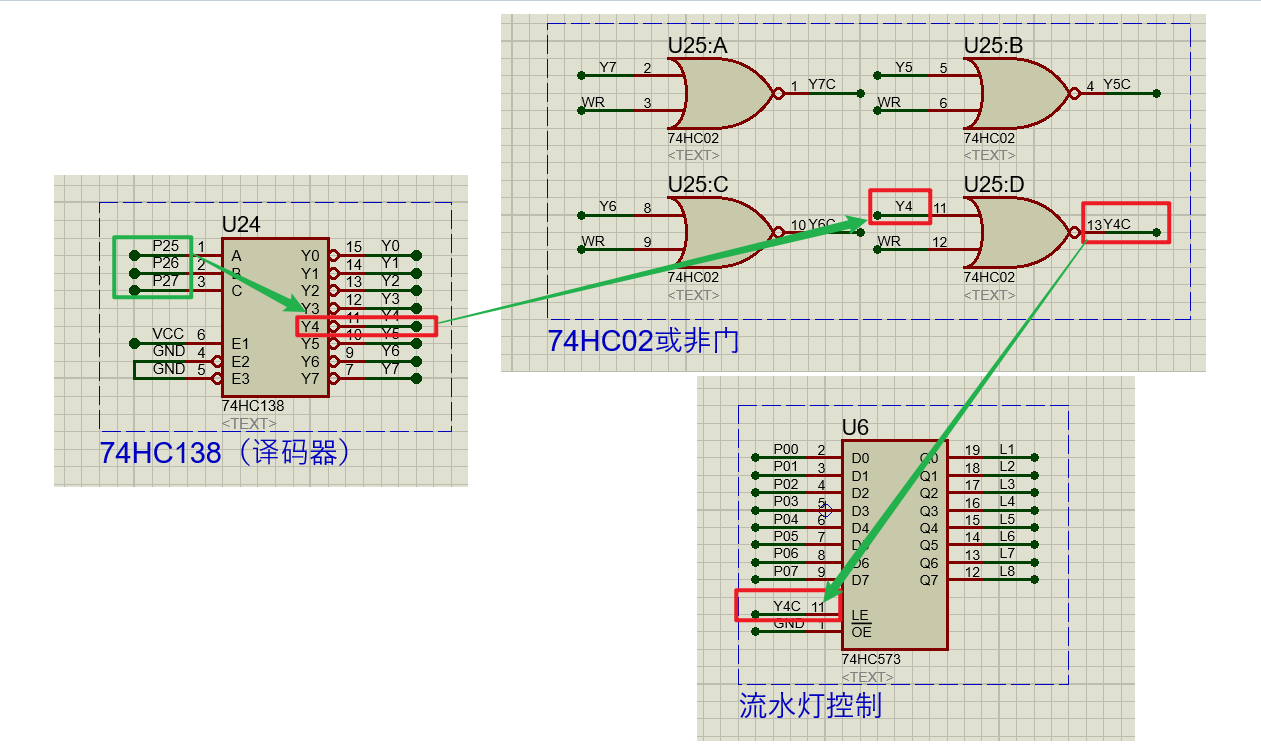
新建工程,以I/O 模式编写代码,在CT107D 单片机综合训练平台上,实现以下功能:
1、系统上电后,关闭8 个LED 灯。
2、循环实现LED 跑马灯控制,控制要求为:
- 首先,8 个LED 灯同时闪烁3 次;
- 然后,从L1 灯至L8 灯依次点亮;
- 接着,从L1 灯至L8 灯依次熄灭

代码实现:
1
2
3
4
5
6
7
8
9
10
11
12
13
14
15
16
17
18
19
20
21
22
23
24
25
26
27
28
29
30
31
32
33
34
35
36
37
38
39
40
41
42
43
44
45
46
47
48
49
| #include <REG51.H>
sbit HC138_A = P2^5;
sbit HC138_B = P2^6;
sbit HC138_C = P2^7;
void Delay(unsigned int t)
{
unsigned char i, j;
while (t > 0) {
i = 2;
j = 239;
do {
while (--j)
;
} while (--i);
t--;
}
}
void main()
{
unsigned int i;
HC138_A = 0;
HC138_B = 0;
HC138_C = 1;
P0 = 0XFF;
while (1) {
for (i = 0; i < 3; i++) {
P0 = 0X00;
Delay(1000);
P0 = 0XFF;
Delay(1000);
}
for (i = 1; i <= 8; i++) {
P0 = (0Xff << i);
Delay(1000);
}
for (i = 1; i <= 8; i++) {
P0 = ~(0Xff << i);
Delay(1000);
}
}
}
|
【基础02】蜂鸣器和继电器的基本控制
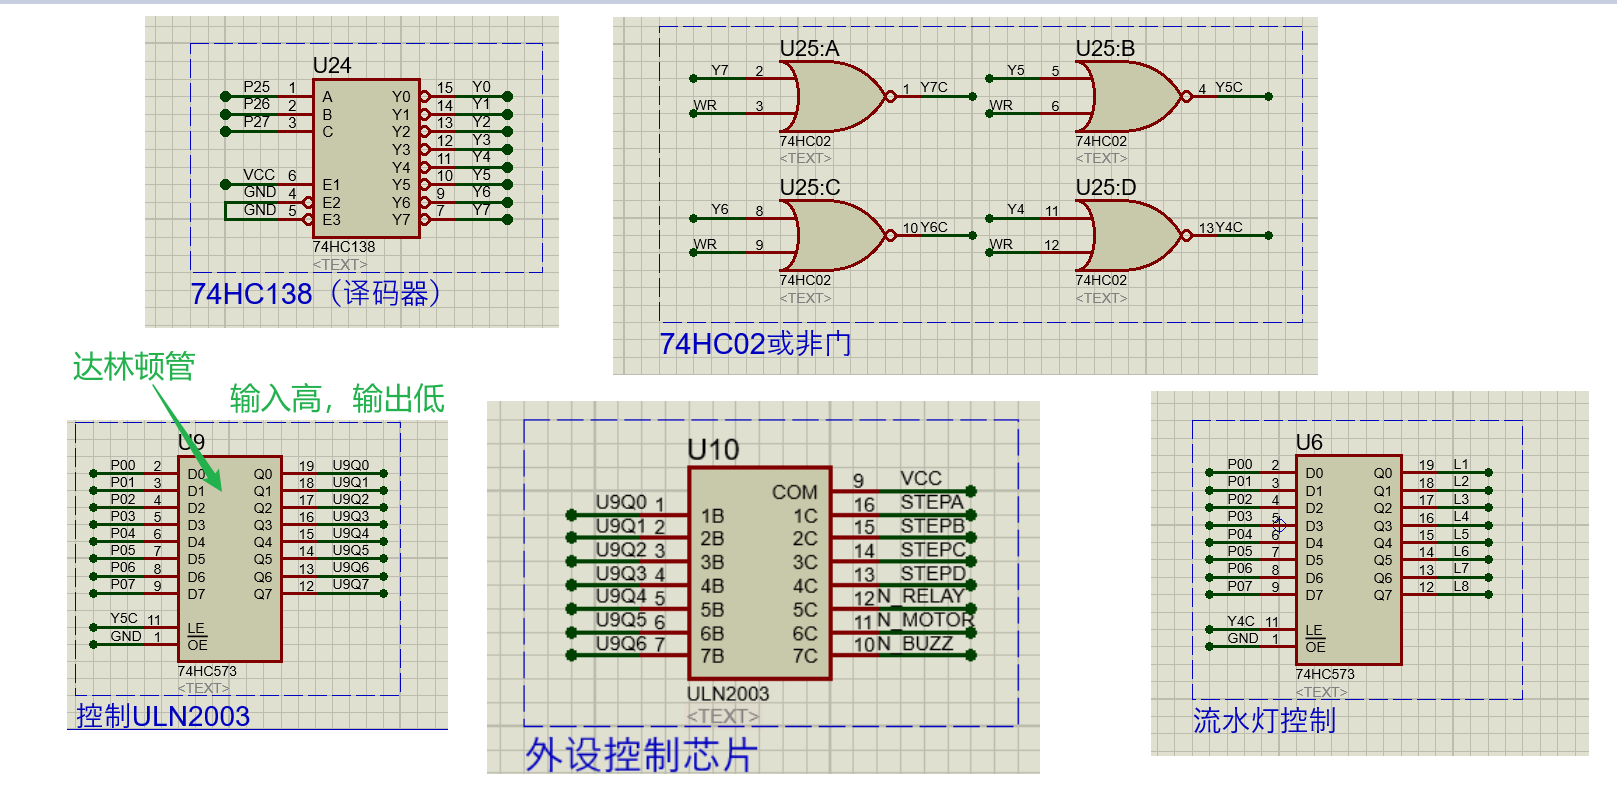
新建工程,以I/O 模式编写代码,在CT107D 单片机综合训练平台上,实现以下功能:
1、系统上电后,关闭蜂鸣器,关闭继电器,关闭8 个LED 灯。
2、循环实现以下功能:
- 首先,8 个LED 灯同时闪烁3 次;
- 接着,从L1 灯至L8 灯依次点亮;
- 然后,继电器吸合,延时片刻,继电器断开;
- 接着,从L1 灯至L8 灯依次熄灭;
- 最后,蜂鸣器鸣叫一会后关闭。

注意达林顿管的存在
代码实现:
1
2
3
4
5
6
7
8
9
10
11
12
13
14
15
16
17
18
19
20
21
22
23
24
25
26
27
28
29
30
31
32
33
34
35
36
37
38
39
40
41
42
43
44
45
46
47
48
49
50
51
52
53
54
55
56
57
58
59
60
61
62
63
64
65
66
67
68
69
70
71
72
73
74
75
76
77
78
79
| #include <REG51.H>
sbit HC138_A = P2^5;
sbit HC138_B = P2^6;
sbit HC138_C = P2^7;
void Delay(unsigned int t)
{
unsigned char i, j;
while (t > 0) {
i = 2;
j = 239;
do {
while (--j)
;
} while (--i);
t--;
}
}
void HC138Init(unsigned int n)
{
if (n == 4) {
HC138_C = 1;
HC138_B = 0;
HC138_A = 0;
} else if (n == 5) {
HC138_C = 1;
HC138_B = 0;
HC138_A = 1;
}else if (n == 0)
{
HC138_C = 0;
HC138_B = 0;
HC138_A = 0;
}
}
void main()
{
unsigned int i;
HC138Init(0);
P0 = 0XFF;
while (1) {
HC138Init(4);
for (i = 0; i < 3; i++) {
P0 = 0X00;
Delay(1000);
P0 = 0XFF;
Delay(1000);
}
for (i = 1; i <= 8; i++) {
P0 = (0Xff << i);
Delay(1000);
}
HC138Init(5);
P0 = 0x10;
Delay(1000);
P0 = 0X00;
Delay(1000);
HC138Init(4);
for (i = 1; i <= 8; i++) {
P0 = ~(0Xff << i);
Delay(1000);
}
HC138Init(5);
P0 = 0x40;
Delay(1000);
P0 = 0X00;
Delay(1000);
}
}
|
【基础03】数码管的静态显示
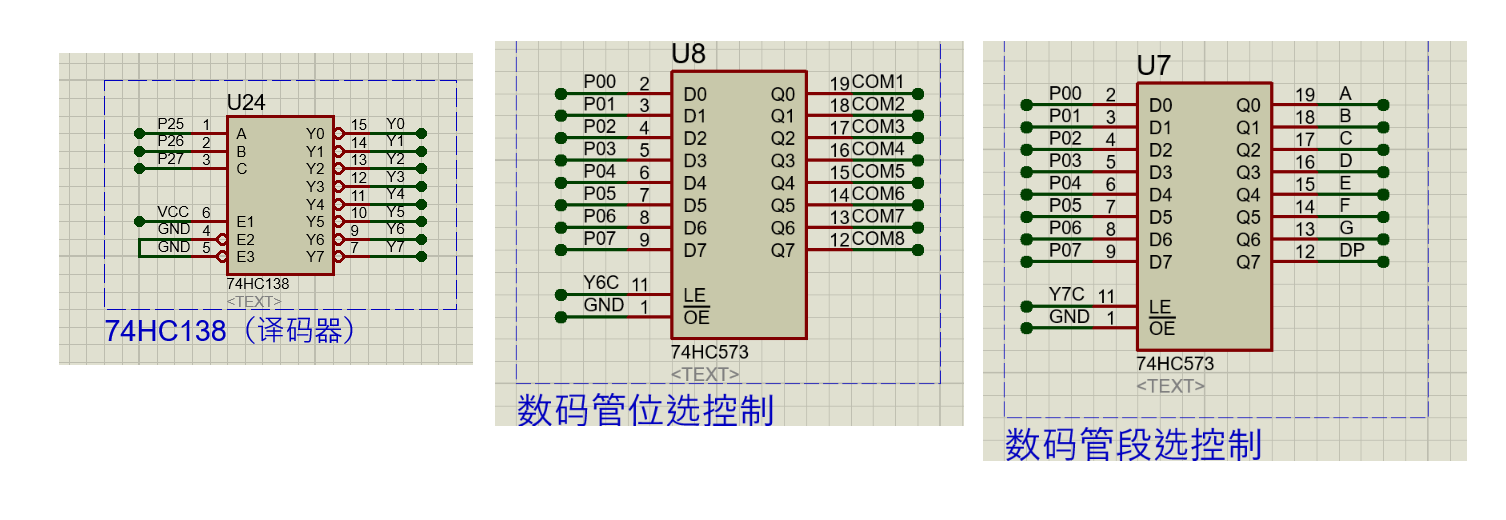
新建工程,以I/O 模式编写代码,在CT107D 单片机综合训练平台上,实现以下功能:
1、系统上电后,关闭蜂鸣器,关闭继电器,关闭8 个LED 灯。
2、8 个数码管从左至右,逐个数码管依次显示“0”到“9”的10 个数字。
- 即左边第1 个数码管依次显示“0”到“9”,其他数码管熄灭;接着左边第2 个数码管
- 依次显示“0”到“9”,其他数码管熄灭…依次类推,直到8 个数码管显示完成。
3、8 个数码管同时显示“0”到“9”的10 个数字和“A”到“F”的6 个字母。
4、循环实现上面2 组数码管的显示功能。

实现代码:
1
2
3
4
5
6
7
8
9
10
11
12
13
14
15
16
17
18
19
20
21
22
23
24
25
26
27
28
29
30
31
32
33
34
35
36
37
38
39
40
41
42
43
44
45
46
47
48
49
50
51
52
53
54
55
56
57
58
59
60
61
62
63
64
65
66
67
68
69
70
71
72
73
74
75
76
77
78
| #include <REG51.H>
sbit HC138_A = P2^5;
sbit HC138_B = P2^6;
sbit HC138_C = P2^7;
unsigned char code Duanma[16] = {0xc0, 0xf9, 0xa4, 0xb0, 0x99, 0x92, 0x82, 0xf8, 0x80, 0x90, 0x88, 0x80, 0xc6, 0xc0, 0x86, 0x8e};
void Delay(unsigned int t);
void HC138Init(unsigned int n);
void LED_Shu(unsigned int location, unsigned int num);
void main()
{
unsigned int i, j;
HC138Init(0);
P0 = 0XFF;
while (1) {
for (i = 0; i < 8; i++) {
for (j = 0; j <= 9; j++) {
LED_Shu(i, j);
Delay(500);
}
}
for (i = 0; i <= 16; i++) {
HC138Init(6);
P0 = 0XFF;
HC138Init(7);
P0 = Duanma[i];
Delay(100);
}
}
}
void Delay(unsigned int t)
{
unsigned char i, j;
while (t > 0) {
i = 2;
j = 239;
do {
while (--j)
;
} while (--i);
t--;
}
}
void HC138Init(unsigned int n)
{
if (n == 4) {
HC138_C = 1;
HC138_B = 0;
HC138_A = 0;
} else if (n == 5) {
HC138_C = 1;
HC138_B = 0;
HC138_A = 1;
} else if (n == 6) {
HC138_C = 1;
HC138_B = 1;
HC138_A = 0;
} else if (n == 7) {
HC138_C = 1;
HC138_B = 1;
HC138_A = 1;
}
}
void LED_Shu(unsigned int location, unsigned int num)
{
HC138Init(6);
P0 = 0x01 << location;
HC138Init(7);
P0 = Duanma[num];
}
|
【基础04】数码管的动态显示
新建工程,以I/O 模式编写代码,在CT107D 单片机综合训练平台上,实现以下功能:
1、系统上电后,关闭蜂鸣器,关闭继电器,关闭8 个LED 灯。
2、在8 位数码管中,左边4 位数码管显示年份“2018”,接着2 位是分隔符“–”,靠右的2 位数码管显示月份。
- 从1 月份开始,每隔一段时间加1 个月,到12 月之后又从1 月开始递增,如此循环往复。
主要delay时间,扫描时间过慢会导致数码管闪烁
记得消抖
实现代码:
1
2
3
4
5
6
7
8
9
10
11
12
13
14
15
16
17
18
19
20
21
22
23
24
25
26
27
28
29
30
31
32
33
34
35
36
37
38
39
40
41
42
43
44
45
46
47
48
49
50
51
52
53
54
55
56
57
58
59
60
61
62
63
64
65
66
67
68
69
70
71
72
73
74
75
76
77
78
79
80
81
82
83
84
85
86
87
88
89
90
91
92
93
94
| #include <REG51.H>
sbit HC138_A = P2 ^ 5;
sbit HC138_B = P2 ^ 6;
sbit HC138_C = P2 ^ 7;
unsigned char code Duanma[18] = {0xc0, 0xf9, 0xa4, 0xb0, 0x99, 0x92, 0x82, 0xf8, 0x80, 0x90, 0x88, 0x80, 0xc6, 0xc0, 0x86, 0x8e, 0xbf, 0x7f};
void Delay(unsigned int t);
void Delay_LED(unsigned int t);
void HC138Init(unsigned int n);
void LED_Shu(unsigned int location, unsigned int num);
void Display();
unsigned int mounth = 1;
void main()
{
HC138Init(0);
P0 = 0XFF;
while (1) {
mounth++;
if (mounth > 12)
mounth = 1;
Delay_LED(200);
}
}
void Delay(unsigned int t)
{
unsigned char i, j;
while (t > 0) {
i = 2;
do {
while (--j)
;
} while (--i);
t--;
}
}
void Delay_LED(unsigned int t)
{
while (t > 0) {
Display();
t--;
}
}
void HC138Init(unsigned int n)
{
if (n == 4) {
HC138_C = 1;
HC138_B = 0;
HC138_A = 0;
} else if (n == 5) {
HC138_C = 1;
HC138_B = 0;
HC138_A = 1;
} else if (n == 6) {
HC138_C = 1;
HC138_B = 1;
HC138_A = 0;
} else if (n == 7) {
HC138_C = 1;
HC138_B = 1;
HC138_A = 1;
}
}
void LED_Shu(unsigned int location, unsigned int num)
{
HC138Init(6);
P0 = 0x01 << location;
HC138Init(7);
P0 = Duanma[num];
Delay(1);
P0 = 0xFF;
}
void Display()
{
LED_Shu(0, 2);
LED_Shu(1, 0);
LED_Shu(2, 1);
LED_Shu(3, 8);
LED_Shu(4, 16);
LED_Shu(5, 16);
LED_Shu(6, mounth / 10);
LED_Shu(7, mounth % 10);
}
|
【基础05】独立按键的基本操作
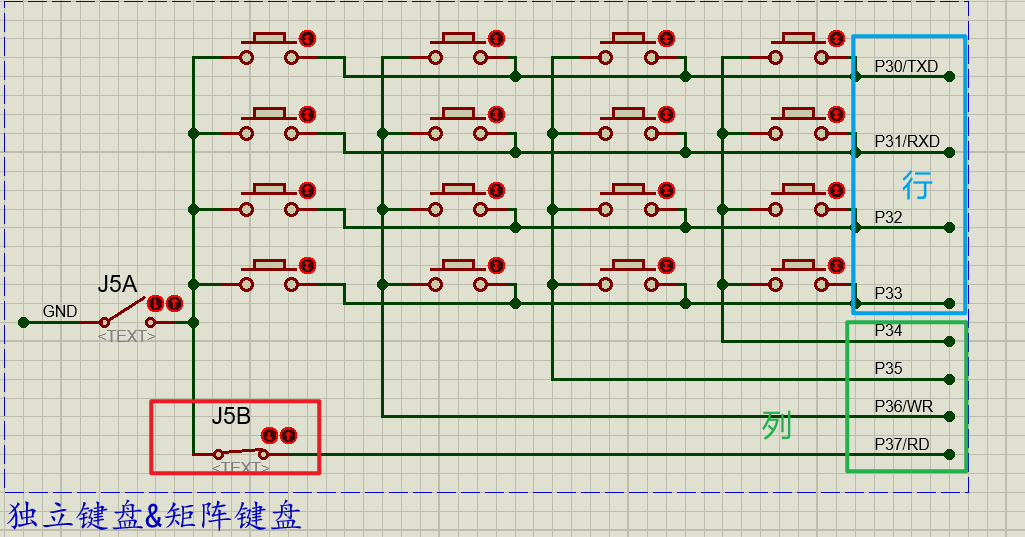
新建工程,以I/O 模式编写代码,在CT107D 单片机综合训练平台上,实现以下功能:
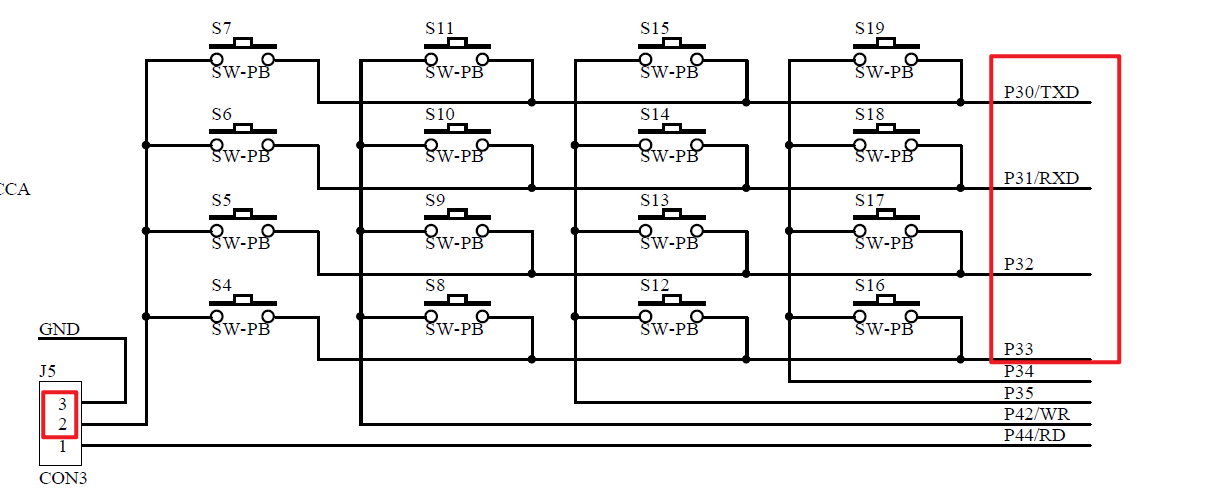
1、将CT107D 上J5 处跳帽接到2~3 引脚,使S4、S5、S6 和S7 成为4 个独立按键。
2、系统上电后,关闭蜂鸣器,关闭继电器,关闭8 个LED 灯。
3、循环扫描按键状态,在确认按键按下时,进行去抖动处理。当S7 按键按下时,点亮L1 指示灯,松开后熄灭;当S6 按键按下时,点亮L2 指示灯,松开后熄灭;当S5 按键按下时,点亮L3 指示灯,松开后熄灭;当S4 按键按下时,点亮L4 指示灯,松开后熄灭。

实现代码:
1
2
3
4
5
6
7
8
9
10
11
12
13
14
15
16
17
18
19
20
21
22
23
24
25
26
27
28
29
30
31
32
33
34
35
36
37
38
39
40
41
42
43
44
45
46
47
48
49
50
51
52
53
54
55
56
57
58
59
60
61
62
63
64
65
66
67
68
69
70
71
72
73
74
75
76
77
78
79
80
81
| #include <REG51.H>
sbit HC138_A = P2 ^ 5;
sbit HC138_B = P2 ^ 6;
sbit HC138_C = P2 ^ 7;
sbit Key1 = P3 ^ 0;
sbit Key2 = P3 ^ 1;
sbit Key3 = P3 ^ 2;
sbit Key4 = P3 ^ 3;
void Delay(unsigned int t);
void HC138Init(unsigned int n);
void main()
{
HC138Init(4);
P0 = 0XFF;
while (1) {
if (Key1 == 0) {
Delay(20);
while (Key1 == 0)
P0 = 0XFE;
Delay(20);
} else if (Key2 == 0) {
Delay(20);
while (Key2 == 0)
P0 = 0XFD;
Delay(20);
} else if (Key3 == 0) {
Delay(20);
while (Key3 == 0)
P0 = 0XFB;
Delay(20);
} else if (Key4 == 0) {
Delay(20);
while (Key4 == 0)
P0 = 0XF7;
Delay(20);
} else {
P0 = 0XFF;
}
}
}
void Delay(unsigned int t)
{
unsigned char i, j;
while (t > 0) {
i = 2;
do {
while (--j)
;
} while (--i);
t--;
}
}
void HC138Init(unsigned int n)
{
P2 = 0x00;
if (n == 4) {
HC138_C = 1;
HC138_B = 0;
HC138_A = 0;
} else if (n == 5) {
HC138_C = 1;
HC138_B = 0;
HC138_A = 1;
} else if (n == 6) {
HC138_C = 1;
HC138_B = 1;
HC138_A = 0;
} else if (n == 7) {
HC138_C = 1;
HC138_B = 1;
HC138_A = 1;
}
}
|
【基础06】独立按键的扩展应用
新建工程,以I/O 模式编写代码,在CT107D 单片机综合训练平台上,实现以下功能:
1、将CT107D 上J5 处跳帽接到2~3 引脚,使S4、S5、S6 和S7 成为4 个独立按键。
2、S7 和S6 为选择键,确定控制键控制那组LED 指示灯;S5 和S4 为控制键,按键按下时点亮指定的LED 指示灯,按键松开,LED 指示灯熄灭。
3、按下S7 按键,点亮L1 指示灯,S6 按键按下无效,不响应操作;此时S5 控制L3 指示灯,S4 控制L4 指示灯;再次按下S7 按键,L1 指示灯熄灭,S6 按键按下有效。
4、按下S6 按键,点亮L2 指示灯,S7 按键按下无效,不响应操作;此时S5 控制L5 指示灯,S4 控制L6 指示灯;再次按下S6 按键,L2 指示灯熄灭,S7 按键按下有效。
5、在S7 和S6 按键都不按下的情况下,即L1 和L2 指示灯均未点亮时,控制键不能操作,S5 和S4 按键按下无效。
6、系统上电后,关闭蜂鸣器,关闭继电器,关闭8 个LED 灯。
7、循环扫描按键状态,根据按键的按下情况,进行相应的处理。
实现代码:
1
2
3
4
5
6
7
8
9
10
11
12
13
14
15
16
17
18
19
20
21
22
23
24
25
26
27
28
29
30
31
32
33
34
35
36
37
38
39
40
41
42
43
44
45
46
47
48
49
50
51
52
53
54
55
56
57
58
59
60
61
62
63
64
65
66
67
68
69
70
71
72
73
74
75
76
77
78
79
80
81
82
83
84
85
86
87
88
89
90
91
92
93
94
95
96
97
98
99
100
101
102
103
104
105
106
107
108
109
110
111
112
113
114
115
116
117
118
119
120
121
122
123
124
125
126
127
128
129
130
131
132
133
134
135
136
137
138
139
140
| #include <REG51.H>
sbit HC138_A = P2 ^ 5;
sbit HC138_B = P2 ^ 6;
sbit HC138_C = P2 ^ 7;
sbit Key1 = P3 ^ 0;
sbit Key2 = P3 ^ 1;
sbit Key3 = P3 ^ 2;
sbit Key4 = P3 ^ 3;
sbit L1 = P0 ^ 0;
sbit L2 = P0 ^ 1;
sbit L3 = P0 ^ 2;
sbit L4 = P0 ^ 3;
sbit L5 = P0 ^ 4;
sbit L6 = P0 ^ 5;
sbit L7 = P0 ^ 6;
sbit L8 = P0 ^ 7;
void Delay(unsigned int t);
void HC138Init(unsigned int n);
int ReadKeyNum();
void main()
{
unsigned int flag1 = 0, flag2 = 0;
unsigned int KeyNum;
HC138Init(4);
P0 = 0XFF;
while (1) {
KeyNum = ReadKeyNum();
if (KeyNum == 1 && flag1 == 0 && flag2 == 0) {
flag1 = 1;
L1 = 0;
} else if (KeyNum == 1 && flag1 == 1 && flag2 == 0) {
flag1 = 0;
L1 = 1;
}
if (KeyNum == 2 && flag2 == 0 && flag1 == 0) {
flag2 = 1;
L2 = 0;
} else if (KeyNum == 2 && flag2 == 1 && flag1 == 0) {
flag2 = 0;
L2 = 1;
}
while (Key3 == 0) {
if (flag1 == 1) {
L3 = 0;
}
if (flag2 == 1) {
L5 = 0;
}
}
L3 = 1;
L5 = 1;
while (Key4 == 0) {
if (flag1 == 1) {
L4 = 0;
}
if (flag2 == 1) {
L6 = 0;
}
}
L4 = 1;
L6 = 1;
}
}
void Delay(unsigned int t)
{
unsigned char i, j;
while (t > 0) {
i = 2;
do {
while (--j)
;
} while (--i);
t--;
}
}
void HC138Init(unsigned int n)
{
P2 = 0x00;
if (n == 4) {
HC138_C = 1;
HC138_B = 0;
HC138_A = 0;
} else if (n == 5) {
HC138_C = 1;
HC138_B = 0;
HC138_A = 1;
} else if (n == 6) {
HC138_C = 1;
HC138_B = 1;
HC138_A = 0;
} else if (n == 7) {
HC138_C = 1;
HC138_B = 1;
HC138_A = 1;
}
}
int ReadKeyNum()
{
if (Key1 == 0) {
Delay(20);
while (Key1 == 0)
;
Delay(20);
return 1;
} else if (Key2 == 0) {
Delay(20);
while (Key2 == 0)
;
Delay(20);
return 2;
} else if (Key3 == 0) {
Delay(20);
while (Key3 == 0)
;
Delay(20);
return 3;
} else if (Key4 == 0) {
Delay(20);
while (Key4 == 0)
;
Delay(20);
return 4;
} else {
return 0;
}
}
|
【基础07】矩阵键盘的基本操作
新建工程,以I/O 模式编写代码,在CT107D 单片机综合训练平台上,实现以下功能:
1、将CT107D 上J5 处跳帽接到1~2 引脚,使S4 到S19 成为4X4 的矩阵键盘。
2、系统上电后,关闭蜂鸣器,关闭继电器,关闭8 个LED 灯。
3、循环扫描矩阵键盘状态,发现有按键按下,等待其松开后,在数码管的最左边1 位显示相应的数字。从左至右,从上到下,依次显示“0”到“F”。即按下S7,显示“0”,按下S11 显示“1”,按下S15 显示“2”,按下S6 显示“4”…依次类推。

实现代码:
1
2
3
4
5
6
7
8
9
10
11
12
13
14
15
16
17
18
19
20
21
22
23
24
25
26
27
28
29
30
31
32
33
34
35
36
37
38
39
40
41
42
43
44
45
46
47
48
49
50
51
52
53
54
55
56
57
58
59
60
61
62
63
64
65
66
67
68
69
70
71
72
73
74
75
76
77
78
79
80
81
82
83
84
85
86
87
88
89
90
91
92
93
94
95
96
97
98
99
100
101
102
103
104
105
106
| #include "REG51.H"
sbit HC138_A = P2^5;
sbit HC138_B = P2^6;
sbit HC138_C = P2^7;
sbit line1 = P3^0;
sbit line2 = P3^1;
sbit line3 = P3^2;
sbit line4 = P3^3;
sbit col1 = P3^7;
sbit col2 = P3^6;
sbit col3 = P3^5;
sbit col4 = P3^4;
unsigned char code Duanma[16] = {0xc0, 0xf9, 0xa4, 0xb0, 0x99, 0x92, 0x82, 0xf8, 0x80, 0x90, 0x88, 0x80, 0xc6, 0xc0, 0x86, 0x8e};
void Delay(unsigned int t);
void HC138Init(unsigned int n);
void LED_Shu(unsigned int location, unsigned int num);
void ReadKeyNum();
unsigned int KeyNumber = 1;
void main()
{
while (1) {
ReadKeyNum();
LED_Shu(0, KeyNumber);
}
}
void Delay(unsigned int t)
{
unsigned char i, j;
while (t > 0) {
i = 2;
j = 239;
do {
while (--j)
;
} while (--i);
t--;
}
}
void HC138Init(unsigned int n)
{
P2 = 0x00;
if (n == 4) {
HC138_C = 1;
HC138_B = 0;
HC138_A = 0;
} else if (n == 5) {
HC138_C = 1;
HC138_B = 0;
HC138_A = 1;
} else if (n == 6) {
HC138_C = 1;
HC138_B = 1;
HC138_A = 0;
} else if (n == 7) {
HC138_C = 1;
HC138_B = 1;
HC138_A = 1;
}
}
void LED_Shu(unsigned int location, unsigned int num)
{
P0 = 0XFF;
HC138Init(6);
P0 = 0x01 << location;
HC138Init(7);
P0 = Duanma[num];
Delay(1);
}
void ReadKeyNum()
{
P3 = 0XFF;
line1 = 0;
if(col1 == 0){Delay(20);while(col1 == 0);Delay(20);KeyNumber = 1;}
if(col2 == 0){Delay(20);while(col2 == 0);Delay(20);KeyNumber = 2;}
if(col3 == 0){Delay(20);while(col3 == 0);Delay(20);KeyNumber = 3;}
if(col4 == 0){Delay(20);while(col4 == 0);Delay(20);KeyNumber = 4;}
P3 = 0XFF;
line2 = 0;
if(col1 == 0){Delay(20);while(col1 == 0);Delay(20);KeyNumber = 5;}
if(col2 == 0){Delay(20);while(col2 == 0);Delay(20);KeyNumber = 6;}
if(col3 == 0){Delay(20);while(col3 == 0);Delay(20);KeyNumber = 7;}
if(col4 == 0){Delay(20);while(col4 == 0);Delay(20);KeyNumber = 8;}
P3 = 0XFF;
line3 = 0;
if(col1 == 0){Delay(20);while(col1 == 0);Delay(20);KeyNumber = 9;}
if(col2 == 0){Delay(20);while(col2 == 0);Delay(20);KeyNumber = 10;}
if(col3 == 0){Delay(20);while(col3 == 0);Delay(20);KeyNumber = 11;}
if(col4 == 0){Delay(20);while(col4 == 0);Delay(20);KeyNumber = 12;}
P3 = 0XFF;
line4 = 0;
if(col1 == 0){Delay(20);while(col1 == 0);Delay(20);KeyNumber = 13;}
if(col2 == 0){Delay(20);while(col2 == 0);Delay(20);KeyNumber = 14;}
if(col3 == 0){Delay(20);while(col3 == 0);Delay(20);KeyNumber = 15;}
if(col4 == 0){Delay(20);while(col4 == 0);Delay(20);KeyNumber = 16;}
}
|
